
 Register
 Log In
 Home
Home

5 Mar ’12
 Offline

That's cool. I like how the described the reed beds -- a cool concept if you have the room and slope of the ground for that. We originally plumbed our house for greywater. I ran into issues in a winter when we came to visit the unfinished house -- water pooled at the end of the lines and froze. We then kept using the sinks, tub, etc. and water backed up into the lines and came into the house. Was freezing outside -- awesome.
That stopped our use of greywater for the time being.
15 Feb ’12
Offline

what did you have it running into? or did you just take it to daylight?
5 Mar ’12
Offline
Just running to daylight to low spots in the ground around the house. I used flexible black PVC lines (that are recommended in greywater books) and did not support them properly. I just had them come out of the house, run on the ground, and end in a low spot. Well, the ground wasn't perfectly flat and water pooled, froze, and then blocked the line.
5 Mar ’12
Offline
Possibly would work. If you come out and help install it I will take pictures from the porch while you dig the hole.
15 Feb ’12
Offline
hmm, I wonder if you did something like this and ran the lines out under a garden area would fix the issue
15 Feb ’12
Offline
lol, that's not fair!

27 Aug ’14
Offline
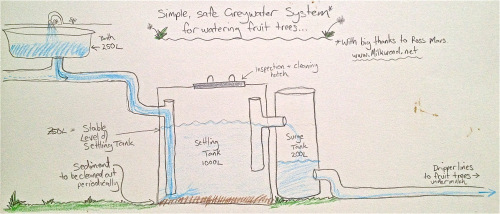
So I am going to bring this thread back from the dead to clarify some things that I couldn't find in their build and perhaps make some improvements. I've hijacked their photo, emailed them a few questions (which I will post their response if one is received), and added a few things from my fluid dynamics class.
The elbow at the inlet will avoid disturbing the sediment at the bottom. By pointing it at the incoming wall, you will avoid discharging it straight into the outlet pipe. The 10" distance is again to avoid disturbing the sediment at the bottom. The outlet pipe's inlet should ideally be as close to the surface of the water as possible. My reasoning for this is that the deeper it is, the closer to the sediment it gets and the inlet flow could pick up some sediment. Four inches keeps it safely away from the grease and floating debris at the top but also a good distance from the bottom of the tank.

I don't mean to bash their design, in fact I would like to say that I appreciate it quite a bit. They make good use of materials and it is very simple. From what I have found online, most systems are abandoned due to nearsighted or overly complex designs. I simply want to continue improving (this comes from my manufacturing work: continuous improvement).
Let me know if you guys have any suggestions as this is what I will be designing mine around for the bathroom addition. My goal is a relatively hands off design that I can leave in the hands of a tenant in the event that I leave the country again.
The following users say thank you to icanreachit for this useful post:
K


Most Users Ever Online: 698
Currently Online:
28 Guest(s)
Currently Browsing this Page:
1 Guest(s)
Top Posters:
easytapper: 2149
DangerDuke: 2030
groinkick: 1667
PorkChopsMmm: 1515
Gravel Road: 1455
Newest Members:
MartinWap
marianaq87
abdulamaya951
deliahoinville
bobmulkey4861
Forum Stats:
Groups: 1
Forums: 12
Topics: 11479
Posts: 58674
Member Stats:
Guest Posters: 2
Members: 3632
Moderators: 0
Admins: 1
Administrators: K

